CompletableFuture 详解
实际项目中,一个接口可能需要同时获取多种不同的数据,然后再汇总返回,这种场景还是挺常见的。举个例子:用户请求获取订单信息,可能需要同时获取用户信息、商品详情、物流信息、商品推荐等数据。
如果是串行(按顺序依次执行每个任务)执行的话,接口的响应速度会非常慢。考虑到这些任务之间有大部分都是 无前后顺序关联 的,可以 并行执行,就比如说调用获取商品详情的时候,可以同时调用获取物流信息。通过并行执行多个任务的方式,接口的响应速度会得到大幅优化。

对于存在前后调用顺序关系的任务,可以进行任务编排。
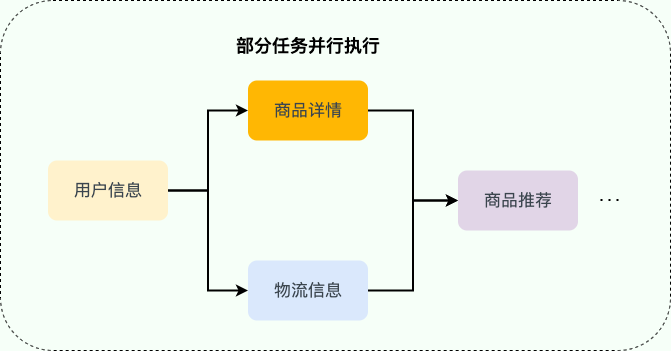
- 获取用户信息之后,才能调用商品详情和物流信息接口。
- 成功获取商品详情和物流信息之后,才能调用商品推荐接口。
可能会用到多线程异步任务编排的场景(这里只是举例,数据不一定是一次返回,可能会对接口进行拆分):
- 首页:例如技术社区的首页可能需要同时获取文章推荐列表、广告栏、文章排行榜、热门话题等信息。
- 详情页:例如技术社区的文章详情页可能需要同时获取作者信息、文章详情、文章评论等信息。
- 统计模块:例如技术社区的后台统计模块可能需要同时获取粉丝数汇总、文章数据(阅读量、评论量、收藏量)汇总等信息。
对于 Java 程序来说,Java 8 才被引入的 CompletableFuture 可以帮助我们来做多个任务的编排,功能非常强大。
这篇文章是 CompletableFuture 的简单入门,带大家看看 CompletableFuture 常用的 API。
Future 介绍
Future 类是异步思想的典型运用,主要用在一些需要执行耗时任务的场景,避免程序一直原地等待耗时任务执行完成,执行效率太低。具体来说是这样的:当我们执行某一耗时的任务时,可以将这个耗时任务交给一个子线程去异步执行,同时我们可以干点其他事情,不用傻傻等待耗时任务执行完成。等我们的事情干完后,我们再通过 Future 类获取到耗时任务的执行结果。这样一来,程序的执行效率就明显提高了。
这其实就是多线程中经典的 Future 模式,你可以将其看作是一种设计模式,核心思想是异步调用,主要用在多线程领域,并非 Java 语言独有。
在 Java 中,Future 类只是一个泛型接口,位于 java.util.concurrent 包下,其中定义了 5 个方法,主要包括下面这 4 个功能:
- 取消任务;
- 判断任务是否被取消;
- 判断任务是否已经执行完成;
- 获取任务执行结果。
// V 代表了Future执行的任务返回值的类型
public interface Future<V> {
    // 取消任务执行
    // 成功取消返回 true,否则返回 false
    boolean cancel(boolean mayInterruptIfRunning);
    // 判断任务是否被取消
    boolean isCancelled();
    // 判断任务是否已经执行完成
    boolean isDone();
    // 获取任务执行结果
    V get() throws InterruptedException, ExecutionException;
    // 指定时间内没有返回计算结果就抛出 TimeOutException 异常
    V get(long timeout, TimeUnit unit)

        throws InterruptedException, ExecutionException, TimeoutExceptio

}
简单理解就是:我有一个任务,提交给了 Future 来处理。任务执行期间我自己可以去做任何想做的事情。并且,在这期间我还可以取消任务以及获取任务的执行状态。一段时间之后,我就可以 Future 那里直接取出任务执行结果。
CompletableFuture 介绍
Future 在实际使用过程中存在一些局限性,比如不支持异步任务的编排组合、获取计算结果的 get() 方法为阻塞调用。
Java 8 才被引入 CompletableFuture 类可以解决 Future 的这些缺陷。CompletableFuture 除了提供了更为好用和强大的 Future 特性之外,还提供了函数式编程、异步任务编排组合(可以将多个异步任务串联起来,组成一个完整的链式调用)等能力。
下面我们来简单看看 CompletableFuture 类的定义。
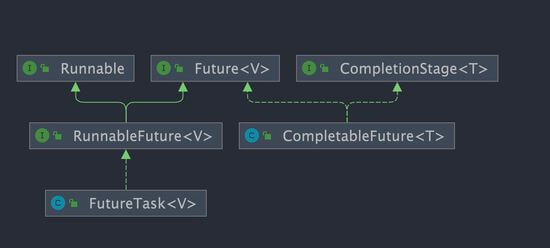
public class CompletableFuture<T> implements Future<T>, CompletionStage<T> {
}可以看到,CompletableFuture 同时实现了 Future 和 CompletionStage 接口。
CompletableFuture 除了提供了更为好用和强大的 Future 特性之外,还提供了函数式编程的能力。

Future 接口有 5 个方法:
boolean cancel(boolean mayInterruptIfRunning):尝试取消执行任务。boolean isCancelled():判断任务是否被取消。boolean isDone():判断任务是否已经被执行完成。get():等待任务执行完成并获取运算结果。get(long timeout, TimeUnit unit):多了一个超时时间。
CompletionStage 接口描述了一个异步计算的阶段。很多计算可以分成多个阶段或步骤,此时可以通过它将所有步骤组合起来,形成异步计算的流水线。
CompletionStage 接口中的方法比较多,CompletableFuture 的函数式能力就是这个接口赋予的。从这个接口的方法参数你就可以发现其大量使用了 Java8 引入的函数式编程。
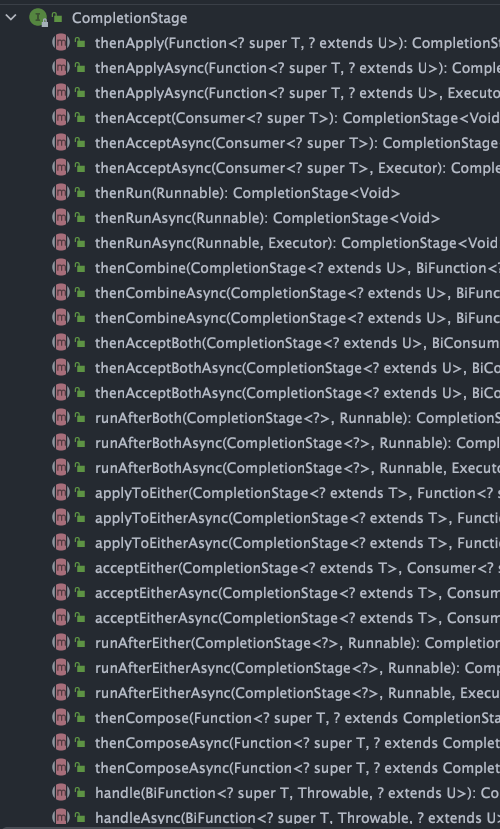
由于方法众多,所以这里不能一一讲解,下文中我会介绍大部分常见方法的使用。
CompletableFuture 常见操作
创建 CompletableFuture
常见的创建 CompletableFuture 对象的方法如下:
- 通过 new 关键字。
- 基于
CompletableFuture自带的静态工厂方法:runAsync()、supplyAsync()。
new 关键字
通过 new 关键字创建 CompletableFuture 对象这种使用方式可以看作是将 CompletableFuture 当做 Future 来使用。
我在我的开源项目 guide-rpc-framework 中就是这种方式创建的 CompletableFuture 对象。
下面咱们来看一个简单的案例。
我们通过创建了一个结果值类型为 RpcResponse<Object> 的 CompletableFuture,你可以把 resultFuture 看作是异步运算结果的载体。
CompletableFuture<RpcResponse<Object>> resultFuture = new CompletableFuture<>();假设在未来的某个时刻,我们得到了最终的结果。这时,我们可以调用 complete() 方法为其传入结果,这表示 resultFuture 已经被完成了。
// complete() 方法只能调用一次,后续调用将被忽略。
resultFuture.complete(rpcResponse);
你可以通过 isDone() 方法来检查是否已经完成。
public boolean isDone() {
    return result != null;
}
获取异步计算的结果也非常简单,直接调用 get() 方法即可。调用 get() 方法的线程会阻塞直到 CompletableFuture 完成运算。
rpcResponse = completableFuture.get();如果你已经知道计算的结果的话,可以使用静态方法 completedFuture() 来创建 CompletableFuture。
CompletableFuture<String> future = CompletableFuture.completedFuture("hello!");
assertEquals("hello!", future.get());
completedFuture() 方法底层调用的是带参数的 new 方法,只不过,这个方法不对外暴露。
public static <U> CompletableFuture<U> completedFuture(U value) {
    return new CompletableFuture<U>((value == null) ? NIL : value);
}
静态工厂方法
这两个方法可以帮助我们封装计算逻辑。
static <U> CompletableFuture<U> supplyAsync(Supplier<U> supplier);
// 使用自定义线程池(推荐)
static <U> CompletableFuture<U> supplyAsync(Supplier<U> supplier, Executor executor);
static CompletableFuture<Void> runAsync(Runnable runnable);
// 使用自定义线程池(推荐)
static CompletableFuture<Void> runAsync(Runnable runnable, Executor executor);
runAsync() 方法接受的参数是 Runnable,这是一个函数式接口,不允许返回值。当你需要异步操作且不关心返回结果的时候可以使用 runAsync() 方法。
@FunctionalInterface
public interface Runnable {
    public abstract void run();
}
supplyAsync() 方法接受的参数是 Supplier<U>,这也是一个函数式接口,U 是返回结果值的类型。
@FunctionalInterface
public interface Supplier<T> {

    /**
     * Gets a result.
     *
     * @return a result
     */
    T get();
}
当你需要异步操作且关心返回结果的时候,可以使用 supplyAsync() 方法。
CompletableFuture<Void> future = CompletableFuture.runAsync(() -> System.out.println("hello!"));
future.get();// 输出 "hello!"
CompletableFuture<String> future2 = CompletableFuture.supplyAsync(() -> "hello!");
assertEquals("hello!", future2.get());
处理异步结算的结果
当我们获取到异步计算的结果之后,还可以对其进行进一步的处理,比较常用的方法有下面几个:
thenApply()thenAccept()thenRun()whenComplete()
thenApply() 方法接受一个 Function 实例,用它来处理结果。
// 沿用上一个任务的线程池
public <U> CompletableFuture<U> thenApply(
    Function<? super T,? extends U> fn) {
    return uniApplyStage(null, fn);
}

//使用默认的 ForkJoinPool 线程池(不推荐)
public <U> CompletableFuture<U> thenApplyAsync(
    Function<? super T,? extends U> fn) {
    return uniApplyStage(defaultExecutor(), fn);
}
// 使用自定义线程池(推荐)
public <U> CompletableFuture<U> thenApplyAsync(
    Function<? super T,? extends U> fn, Executor executor) {
    return uniApplyStage(screenExecutor(executor), fn);
}
thenApply() 方法使用示例如下:
CompletableFuture<String> future = CompletableFuture.completedFuture("hello!")
        .thenApply(s -> s + "world!");
assertEquals("hello!world!", future.get());
// 这次调用将被忽略。
future.thenApply(s -> s + "nice!");
assertEquals("hello!world!", future.get());
你还可以进行 流式调用:
CompletableFuture<String> future = CompletableFuture.completedFuture("hello!")
        .thenApply(s -> s + "world!").thenApply(s -> s + "nice!");
assertEquals("hello!world!nice!", future.get());
如果你不需要从回调函数中获取返回结果,可以使用 thenAccept() 或者 thenRun()。这两个方法的区别在于 thenRun() 不能访问异步计算的结果。
thenAccept() 方法的参数是 Consumer<? super T>。
public CompletableFuture<Void> thenAccept(Consumer<? super T> action) {
    return uniAcceptStage(null, action);
}

public CompletableFuture<Void> thenAcceptAsync(Consumer<? super T> action) {
    return uniAcceptStage(defaultExecutor(), action);
}

public CompletableFuture<Void> thenAcceptAsync(Consumer<? super T> action,
                                               Executor executor) {
    return uniAcceptStage(screenExecutor(executor), action);
}顾名思义,Consumer 属于消费型接口,它可以接收 1 个输入对象然后进行“消费”。
@FunctionalInterface
public interface Consumer<T> {

    void accept(T t);

    default Consumer<T> andThen(Consumer<? super T> after) {
        Objects.requireNonNull(after);
        return (T t) -> { accept(t); after.accept(t); };
    }
}
thenRun() 的方法是的参数是 Runnable。
public CompletableFuture<Void> thenRun(Runnable action) {
    return uniRunStage(null, action);
}

public CompletableFuture<Void> thenRunAsync(Runnable action) {
    return uniRunStage(defaultExecutor(), action);
}

public CompletableFuture<Void> thenRunAsync(Runnable action,
                                            Executor executor) {
    return uniRunStage(screenExecutor(executor), action);
}
thenAccept() 和 thenRun() 使用示例如下:
CompletableFuture.completedFuture("hello!")
        .thenApply(s -> s + "world!").thenApply(s -> s + "nice!").thenAccept(System.out::println);//hello!world!nice!

CompletableFuture.completedFuture("hello!")
        .thenApply(s -> s + "world!").thenApply(s -> s + "nice!").thenRun(() -> System.out.println("hello!"));//hello!
whenComplete() 的方法的参数是 BiConsumer<? super T, ? super Throwable>。
public CompletableFuture<T> whenComplete(
    BiConsumer<? super T, ? super Throwable> action) {
    return uniWhenCompleteStage(null, action);
}


public CompletableFuture<T> whenCompleteAsync(
    BiConsumer<? super T, ? super Throwable> action) {
    return uniWhenCompleteStage(defaultExecutor(), action);
}
// 使用自定义线程池(推荐)
public CompletableFuture<T> whenCompleteAsync(
    BiConsumer<? super T, ? super Throwable> action, Executor executor) {
    return uniWhenCompleteStage(screenExecutor(executor), action);
}
相对于 Consumer, BiConsumer 可以接收 2 个输入对象然后进行“消费”。
@FunctionalInterface
public interface BiConsumer<T, U> {
    void accept(T t, U u);

    default BiConsumer<T, U> andThen(BiConsumer<? super T, ? super U> after) {
        Objects.requireNonNull(after);

        return (l, r) -> {
            accept(l, r);
            after.accept(l, r);
        };
    }
}
whenComplete() 使用示例如下:
CompletableFuture<String> future = CompletableFuture.supplyAsync(() -> "hello!")
        .whenComplete((res, ex) -> {
            // res 代表返回的结果
            // ex 的类型为 Throwable ,代表抛出的异常
            System.out.println(res);
            // 这里没有抛出异常所有为 null
            assertNull(ex);
        });
assertEquals("hello!", future.get());
异常处理
你可以通过 handle() 方法来处理任务执行过程中可能出现的抛出异常的情况。
public <U> CompletableFuture<U> handle(
    BiFunction<? super T, Throwable, ? extends U> fn) {
    return uniHandleStage(null, fn);
}

public <U> CompletableFuture<U> handleAsync(
    BiFunction<? super T, Throwable, ? extends U> fn) {
    return uniHandleStage(defaultExecutor(), fn);
}

public <U> CompletableFuture<U> handleAsync(
    BiFunction<? super T, Throwable, ? extends U> fn, Executor executor) {
    return uniHandleStage(screenExecutor(executor), fn);
}
示例代码如下:
CompletableFuture<String> future
        = CompletableFuture.supplyAsync(() -> {
    if (true) {
        throw new RuntimeException("Computation error!");
    }
    return "hello!";
}).handle((res, ex) -> {
    // res 代表返回的结果
    // ex 的类型为 Throwable ,代表抛出的异常
    return res != null ? res : "world!";
});
assertEquals("world!", future.get());
你还可以通过 exceptionally() 方法来处理异常情况。
CompletableFuture<String> future
        = CompletableFuture.supplyAsync(() -> {
    if (true) {
        throw new RuntimeException("Computation error!");
    }
    return "hello!";
}).exceptionally(ex -> {
    System.out.println(ex.toString());// CompletionException
    return "world!";
});
assertEquals("world!", future.get());
如果你想让 CompletableFuture 的结果就是异常的话,可以使用 completeExceptionally() 方法为其赋值。
CompletableFuture<String> completableFuture = new CompletableFuture<>();
// ...
completableFuture.completeExceptionally(
  new RuntimeException("Calculation failed!"));
// ...
completableFuture.get(); // ExecutionException
组合 CompletableFuture
你可以使用 thenCompose() 按顺序链接两个 CompletableFuture 对象,实现异步的任务链。它的作用是将前一个任务的返回结果作为下一个任务的输入参数,从而形成一个依赖关系。
public <U> CompletableFuture<U> thenCompose(
    Function<? super T, ? extends CompletionStage<U>> fn) {
    return uniComposeStage(null, fn);
}

public <U> CompletableFuture<U> thenComposeAsync(
    Function<? super T, ? extends CompletionStage<U>> fn) {
    return uniComposeStage(defaultExecutor(), fn);
}

public <U> CompletableFuture<U> thenComposeAsync(
    Function<? super T, ? extends CompletionStage<U>> fn,
    Executor executor) {
    return uniComposeStage(screenExecutor(executor), fn);
}
thenCompose() 方法会使用示例如下:
CompletableFuture<String> future
        = CompletableFuture.supplyAsync(() -> "hello!")
        .thenCompose(s -> CompletableFuture.supplyAsync(() -> s + "world!"));
assertEquals("hello!world!", future.get());
在实际开发中,这个方法还是非常有用的。比如说,task1 和 task2 都是异步执行的,但 task1 必须执行完成后才能开始执行 task2(task2 依赖 task1 的执行结果)。
和 thenCompose() 方法类似的还有 thenCombine() 方法, 它同样可以组合两个 CompletableFuture 对象。
CompletableFuture<String> completableFuture
        = CompletableFuture.supplyAsync(() -> "hello!")
        .thenCombine(CompletableFuture.supplyAsync(
                () -> "world!"), (s1, s2) -> s1 + s2)
        .thenCompose(s -> CompletableFuture.supplyAsync(() -> s + "nice!"));
assertEquals("hello!world!nice!", completableFuture.get());
那 thenCompose() 和 thenCombine() 有什么区别呢?
thenCompose()可以链接两个CompletableFuture对象,并将前一个任务的返回结果作为下一个任务的参数,它们之间存在着先后顺序。thenCombine()会在两个任务都执行完成后,把两个任务的结果合并。两个任务是并行执行的,它们之间并没有先后依赖顺序。
除了 thenCompose() 和 thenCombine() 之外, 还有一些其他的组合 CompletableFuture 的方法用于实现不同的效果,满足不同的业务需求。
例如,如果我们想要实现 task1 和 task2 中的任意一个任务执行完后就执行 task3 的话,可以使用 acceptEither()。
public CompletableFuture<Void> acceptEither(
    CompletionStage<? extends T> other, Consumer<? super T> action) {
    return orAcceptStage(null, other, action);
}

public CompletableFuture<Void> acceptEitherAsync(
    CompletionStage<? extends T> other, Consumer<? super T> action) {
    return orAcceptStage(asyncPool, other, action);
}
简单举一个例子:
CompletableFuture<String> task = CompletableFuture.supplyAsync(() -> {
    System.out.println("任务1开始执行,当前时间:" + System.currentTimeMillis());
    try {
        Thread.sleep(500);
    } catch (InterruptedException e) {
        e.printStackTrace();
    }
    System.out.println("任务1执行完毕,当前时间:" + System.currentTimeMillis());
    return "task1";
});

CompletableFuture<String> task2 = CompletableFuture.supplyAsync(() -> {
    System.out.println("任务2开始执行,当前时间:" + System.currentTimeMillis());
    try {
        Thread.sleep(1000);
    } catch (InterruptedException e) {
        e.printStackTrace();
    }
    System.out.println("任务2执行完毕,当前时间:" + System.currentTimeMillis());
    return "task2";
});

task.acceptEitherAsync(task2, (res) -> {
    System.out.println("任务3开始执行,当前时间:" + System.currentTimeMillis());
    System.out.println("上一个任务的结果为:" + res);
});

// 增加一些延迟时间,确保异步任务有足够的时间完成
try {
    Thread.sleep(2000);
} catch (InterruptedException e) {
    e.printStackTrace();
}
输出:
任务1开始执行,当前时间:1695088058520
任务2开始执行,当前时间:1695088058521
任务1执行完毕,当前时间:1695088059023
任务3开始执行,当前时间:1695088059023
上一个任务的结果为:task1
任务2执行完毕,当前时间:1695088059523
任务组合操作 acceptEitherAsync() 会在异步任务 1 和异步任务 2 中的任意一个完成时触发执行任务 3,但是需要注意,这个触发时机是不确定的。如果任务 1 和任务 2 都还未完成,那么任务 3 就不能被执行。
并行运行多个 CompletableFuture
你可以通过 CompletableFuture 的 allOf() 这个静态方法来并行运行多个 CompletableFuture。
实际项目中,我们经常需要并行运行多个互不相关的任务,这些任务之间没有依赖关系,可以互相独立地运行。
比说我们要读取处理 6 个文件,这 6 个任务都是没有执行顺序依赖的任务,但是我们需要返回给用户的时候将这几个文件的处理的结果进行统计整理。像这种情况我们就可以使用并行运行多个 CompletableFuture 来处理。
示例代码如下:
CompletableFuture<Void> task1 =
  CompletableFuture.supplyAsync(()->{
    //自定义业务操作
  });
......
CompletableFuture<Void> task6 =
  CompletableFuture.supplyAsync(()->{
    //自定义业务操作
  });
......
 CompletableFuture<Void> headerFuture=CompletableFuture.allOf(task1,.....,task6);

  try {
    headerFuture.join();
  } catch (Exception ex) {
    ......
  }
System.out.println("all done. ");
经常和 allOf() 方法拿来对比的是 anyOf() 方法。
allOf() 方法会等到所有的 CompletableFuture 都运行完成之后再返回
Random rand = new Random();
CompletableFuture<String> future1 = CompletableFuture.supplyAsync(() -> {
    try {
        Thread.sleep(1000 + rand.nextInt(1000));
    } catch (InterruptedException e) {
        e.printStackTrace();
    } finally {
        System.out.println("future1 done...");
    }
    return "abc";
});
CompletableFuture<String> future2 = CompletableFuture.supplyAsync(() -> {
    try {
        Thread.sleep(1000 + rand.nextInt(1000));
    } catch (InterruptedException e) {
        e.printStackTrace();
    } finally {
        System.out.println("future2 done...");
    }
    return "efg";
});
调用 join() 可以让程序等 future1 和 future2 都运行完了之后再继续执行。
CompletableFuture<Void> completableFuture = CompletableFuture.allOf(future1, future2);
completableFuture.join();
assertTrue(completableFuture.isDone());
System.out.println("all futures done...");
输出:
future1 done...
future2 done...
all futures done...
anyOf() 方法不会等待所有的 CompletableFuture 都运行完成之后再返回,只要有一个执行完成即可!
CompletableFuture<Object> f = CompletableFuture.anyOf(future1, future2);
System.out.println(f.get());
输出结果可能是:
future2 done...
efg
也可能是:
future1 done...
abc
CompletableFuture 使用建议
使用自定义线程池
我们上面的代码示例中,为了方便,都没有选择自定义线程池。实际项目中,这是不可取的。
CompletableFuture 默认使用全局共享的 ForkJoinPool.commonPool() 作为执行器,所有未指定执行器的异步任务都会使用该线程池。这意味着应用程序、多个库或框架(如 Spring、第三方库)若都依赖 CompletableFuture,默认情况下它们都会共享同一个线程池。
虽然 ForkJoinPool 效率很高,但当同时提交大量任务时,可能会导致资源竞争和线程饥饿,进而影响系统性能。
为避免这些问题,建议为 CompletableFuture 提供自定义线程池,带来以下优势:
- 隔离性:为不同任务分配独立的线程池,避免全局线程池资源争夺。
- 资源控制:根据任务特性调整线程池大小和队列类型,优化性能表现。
- 异常处理:通过自定义
ThreadFactory更好地处理线程中的异常情况。
private ThreadPoolExecutor executor = new ThreadPoolExecutor(10, 10,
        0L, TimeUnit.MILLISECONDS,
        new LinkedBlockingQueue<Runnable>());

CompletableFuture.runAsync(() -> {
     //...
}, executor);
尽量避免使用 get()
CompletableFuture 的 get() 方法是阻塞的,尽量避免使用。如果必须要使用的话,需要添加超时时间,否则可能会导致主线程一直等待,无法执行其他任务。
    CompletableFuture<String> future = CompletableFuture.supplyAsync(() -> {
        try {
            Thread.sleep(10_000);
        } catch (InterruptedException e) {
            e.printStackTrace();
        }
        return "Hello, world!";
    });

    // 获取异步任务的返回值,设置超时时间为 5 秒
    try {
        String result = future.get(5, TimeUnit.SECONDS);
        System.out.println(result);
    } catch (InterruptedException | ExecutionException | TimeoutException e) {
        // 处理异常
        e.printStackTrace();
    }
}
上面这段代码在调用 get() 时抛出了 TimeoutException 异常。这样我们就可以在异常处理中进行相应的操作,比如取消任务、重试任务、记录日志等。
正确进行异常处理
使用 CompletableFuture 的时候一定要以正确的方式进行异常处理,避免异常丢失或者出现不可控问题。
下面是一些建议:
- 使用
whenComplete方法可以在任务完成时触发回调函数,并正确地处理异常,而不是让异常被吞噬或丢失。 - 使用
exceptionally方法可以处理异常并重新抛出,以便异常能够传播到后续阶段,而不是让异常被忽略或终止。 - 使用
handle方法可以处理正常的返回结果和异常,并返回一个新的结果,而不是让异常影响正常的业务逻辑。 - 使用
CompletableFuture.allOf方法可以组合多个CompletableFuture,并统一处理所有任务的异常,而不是让异常处理过于冗长或重复。 - ……
合理组合多个异步任务
正确使用 thenCompose()、 thenCombine()、acceptEither()、allOf()、anyOf() 等方法来组合多个异步任务,以满足实际业务的需求,提高程序执行效率。
实际使用中,我们还可以利用或者参考现成的异步任务编排框架,比如京东的 asyncTool。
后记
这篇文章只是简单介绍了 CompletableFuture 的核心概念和比较常用的一些 API。如果想要深入学习的话,还可以多找一些书籍和博客看,比如下面几篇文章就挺不错:
- CompletableFuture 原理与实践-外卖商家端 API 的异步化 - 美团技术团队:这篇文章详细介绍了
CompletableFuture在实际项目中的运用。参考这篇文章,可以对项目中类似的场景进行优化,也算是一个小亮点了。这种性能优化方式比较简单且效果还不错! - 读 RocketMQ 源码,学习并发编程三大神器 - 勇哥 java 实战分享:这篇文章介绍了 RocketMQ 对
CompletableFuture的应用。具体来说,从 RocketMQ 4.7 开始,RocketMQ 引入了CompletableFuture来实现异步消息处理。
另外,建议 G 友们可以看看京东的 asyncTool 这个并发框架,里面大量使用到了 CompletableFuture。
写在最后
如果内容对你有帮助的话,欢迎顺手给 JavaGuide 点一个免费的 Star 支持一下:GitHub | Gitee。
JavaGuide 已持续维护近七年,累计 6100+ 次提交,来自 620+ 位贡献者共同完善。你的 Star、反馈和 PR,都是这个项目继续更新的动力。
如果你正在准备后端/AI 应用开发面试,也可以了解一下我的知识星球,里面包括后端和 AI 实战项目、简历优化、一对一提问和高频考点资料,已经持续维护六年。